Product FAQs

  1. Verify Mimio Studio 11 or above is installed.
  2. Verify the wireless USB receiver is connected to your PC’s USB port.
  3. Press and hold the power LED button on the MimioPad until it begins to blink (approximately 10 seconds).
  4. Open Mimio Notebook.
  5. Select the Tools menu, then select Settings.
  6. Select Classroom Devices (the MimioPad should show as Available under the Status column).

     
  7. Select MimioPad from the list and then select the Connect button. The MimioPad status should change to Connected.

When you add the MimioPad wireless tablet to your MimioTeach system, you and your students can collaborate on whiteboard lessons from up to 30 meters (100 feet) from the classroom computer. The MimioPad tablet works with a rechargeable pen stylus and MimioStudio software. You can access the most common operations of MimioStudio software from custom-tailored shortcut keys on the tablet. Up to 50 MimioPad tablets can connect to one computer, so students can participate without leaving their seats. The MimioPad tablet allows for effective student engagement during a lesson and is especially useful with kinesthetic learners (students who learn by touch). With the MimioPad tablet, teachers have built-in classroom management and can freely move around the classroom.

If your MimioPad tablet is displaying a solid amber light, it means that it is not paired to the MimioHub receiver. On your computer, make sure the MimioHub receiver is inserted into a USB port and that it’s solid green. From there, open MimioStudio Notebook and go to Tools > Settings > Classroom Devices (on a PC), or Notebook > Preferences > Classroom Devices (on a Mac). If the MimioHub receiver is working, it will show “MimioHub – Connected” in the list. Keep this window open and then hold down the amber light on the front of the MimioPad tablet for approximately 20 seconds. Once that is done, the MimioPad device should show up under Classroom Devices as “Available.” Select it and click the “Connect” button in the bottom right corner of the window. The light on the device will now turn green and it should function properly. If you still cannot get the unit to connect after following these steps, contact [email protected] for additional troubleshooting.

The MimioPad only works on the primary monitor. You can change your second monitor to be the primary monitor if you want to use the MimioPad on the projected screen.

Please see the link below if you run into problems changing the primary monitor.

http://windows.microsoft.com/en-US/windows-vista/Change-display-settings-on-multiple-monitors

With the latest version of MimioMobile, you can collaborate with an unlimited number of students and one teacher using any mix of MimioPads and/or iPads running MimioMobile.

It will work up to 30 feet (9 meters) from the computer.

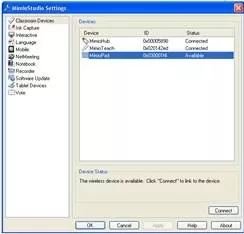
Open MimioStudio Notebook and go to Tools > Settings > Tablet Devices (on a PC), or Notebook > Preferences > Tablet Devices (on a Mac). Once there, right click on the device in the list, and you will be able to select it as a teacher or a student device. If you do not see anything in the Tablet Devices list, make sure that your MimioPad tablet is paired to the MimioHub receiver and shows up under Tools > Settings > Classroom Devices (on a PC), or Notebook > Preferences > Classroom Devices (on a Mac).

Note: The MimioPad 2 tablet requires version 10 or higher of MimioStudio™ software to function properly.

MimioStudio on a laptop with a class in the background

Check out our free MimioStudio Software Training Course. 

This self-paced, online course, will teach you the essential features and functions of MimioStudio software in your classroom. 

Learn More

background image

Need Further Assistance

Contact our customer care team.


To find out more about additional Professional Development offerings, click here.

Back to top