


Product FAQs
A flashing amber means the Mimio device is looking to connect to any USB hub—it recognizes that there is a hub available to communicate to. If using Windows, open MimioStudio and go to Tools > Settings > Classroom Devices. If using Mac, go to the Apple header and select Notebook > Preferences > Classroom Devices to make sure that MimioTeach or Vote is connected. If it is not connected (might show available), then highlight the MimioTeach and click Connect. If you are successful re-pairing the Mimio wireless components, the power/status LED on the Mimio devices should turn to solid green. This initiates the pairing process. A flashing green means that the USB hub is plugged in and recognizes the MimioTeach or Vote because it was connected to it before but mimiosys.exe has been terminated, and once MimioStudio is open you will get a solid green. If you continue to have issues, please reach out to Technical Support for additional troubleshooting.
The hardware and software both support two MimioVotes being chained together to form a 64-unit MimioVote. One set will be numbered 1–32 and the other will be 33–64.
If a MimioVote handset shows EE with other characters (click here for an example), this means the handset’s ID has been assigned to a different handset. This is normal. To correct the display, place the handset in the MimioVote tray and the correct ID will be assigned to the handset.
If a MimioVote handset shows EE with no other symbols (click here for an example), it means:
- The handset was removed during a firmware update. Replace the handset to the MimioVote tray and the message will be cleared.
- The handset is incapable of successfully installing a firmware update. When this failure occurs, the handset will attempt to download firmware every time it is placed in the station. However, it will always display EE when removed from the station—even when the firmware download has been allowed to complete. This will indicate that the handset will need to be replaced and you should reach out to Technical Support for warranty verification. Click here to contact Technical Support for a replacement handset.
There is no limit to the number of iPads that can be used as a MimioVote handset device.
- Verify Mimio Studio 11 or above is installed.
- Verify the wireless USB receiver is connected to your PC’s USB port.
- Press and hold the power LED button on the MimioVote charging station until it begins to blink (approximately 20 seconds).

- Open Mimio Notebook.
- Select the Tools menu, then select Settings.
- Select Classroom Devices. The MimioVote should show as Available under the Status column.
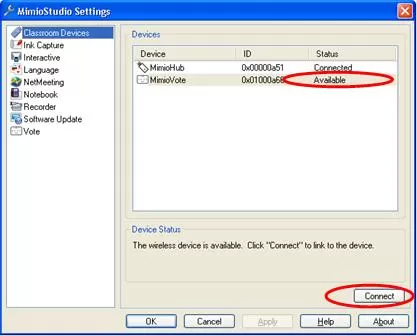
- Select MimioVote from the list and then select the Connect button. The MimioVote status should change to Connected.
Yes, it is possible to connect a wireless USB receiver into a USB hub.
You can import students from a Unicode text file (TXT) or a comma-separated value file (CSV). Each student must have at least a first or last name assigned to them in order to be imported. Whether or not we use all the columns, the header must contain all of the fields.
The following fields are supported for importing into Gradebook:
- StudentID
- FirstName
- MiddleName
- LastName
- Gender
- Birthdate
- Address
- City
- State
- Zipcode
- Country
Each student that you add to a class is automatically assigned a MimioVote unit number.
To import a class list.
- In Gradebook, display the class you want to import the student list into.
- From the File menu, choose Import, and then choose Students. The Open dialog box appears.
- Navigate to and select the file you want to import, and then click Open. The list of students is imported and displayed in the Gradebook.
Microsoft Office applications can disable add-ins that behave unexpectedly while they are being loaded. If an application does not load your add-in, the application might have hard disabled or soft disabled it. It’s important to note there are known issues at this time with Office ’13 and above, and the Vote add-in not being available or not working as expected. We are aware of these issues and continue to work with Microsoft to gain compatibility again for newer versions.
To re-enable an add-in that has been hard disabled by PowerPoint 2010, please do the following:
Launch PowerPoint 2010.
Choose File > Options > Add-Ins.
In the Manage box, click COM Add-ins, and then click Go.
In the COM Add-ins window, click Add.
Look in for “crs_powerpoint.dll” at C:\Program Files\mimio\MimioStudio\system.
Select crs_powerpoint.dll and click OK.
Make sure MimioVote is selected and click OK.
To re-enable an add-in that has been hard disabled by PowerPoint 2007, please do the following:
Open PowerPoint and click the Microsoft Office button.
Click the PowerPoint Options button.
In the categories pane, click Add-ins.
In the Manage box, click COM Add-ins, and then click Go.
In the COM Add-ins window, click Add.
Look in for “crs_powerpoint.dll” at C:\Program Files\mimio\MimioStudio\system.
Select crs_powerpoint.dll and click OK.
Make sure MimioVote is selected and click OK.
To re-enable an add-in that has been hard disabled by PowerPoint 2003, please do the following:
Start PowerPoint 2003.
On the Tools menu, click Customize.
Click on the Commands tab.
Under the Categories heading, select Tools.
Under the Commands heading, scroll down until you see Com Add-Ins.
With the left mouse button, click and hold down on the Com Add-Ins icon.
While holding down on the left mouse button, drag the Com Add-Ins icon up to the toolbar in PowerPoint.
Double-click on the Com Add-Ins icon that appears in the PowerPoint toolbar.
In the COM Add-ins windows, click Add.
Look in for “crs_powerpoint.dll” at C:\Program Files\mimio\MimioStudio\system.
Select crs_powerpoint.dll and click OK.
Make sure MimioVote is selected and click OK.
The MimioVote system requires the MimioHub wireless receiver, which comes standard with the system. The receiver integrates automatically with the MimioVote system, allowing it to send data instantly to your computer.
The remote has a range of up to 9 m (30 ft). In addition, you don’t have to ensure that there is a line of sight between the remote and the MimioTeach device, because the MimioVote system uses radio frequency technology.
Try to isolate the issue to the specific handset by making sure that another Vote handset placed in the same spot is working correctly. If another Vote handset is working correctly on that same spot, then we have isolated the issue to the specific handset. Next, unscrew the Vote handset and check to see if the battery has become loose. If the battery is in place and the handset still has a blinking backlight, then contact Technical Support to inquire about an RMA.
The life of the replaceable batteries is typically 3 years. A full charge of a unit that has lost all power (due to being left out of the charging tray for a long time) takes about 10 to 12 hours. Teachers can easily recharge the units in their tray overnight.
There is a limit of 199 questions on the MimioVote handsets. The MimioStudio software will still run on the extra questions, but Gradebook will only capture the first 199 responses.
You can import standard assessments into MimioStudio Notebook for use with the MimioVote system. Only files that have been exported from ExamView as Blackboard (6.0-7.0) format can be imported into Notebook.
The range between the USB receiver and the Vote station is 30ft.
The range between the Vote station and Vote handsets is 100ft.
Radio frequency technology offers a major advantage over infrared frequency as it does not require that there be a line of sight between the remote and the MimioTeach device. There are other benefits as well, including:
- Students can comfortably hold and operate their remotes.
- Students can effectively operate their remotes from anywhere in the classroom.
- Teachers can connect and position their receivers to best suit their environment.
Other wireless devices, such as microwave ovens or wireless routers, do not normally interfere with the MimioVote response system, but it is possible. MimioStudio software has the ability to choose a different channel whenever it detects channel interference. However, this is an automatic feature and there is no way to manually change this within the software.
You can import or create as many classes as you want in Gradebook. Once you have created a class, you can add students to the class by manually entering all student names and information, or you can import a list of students.
Students can use the forward or backward buttons in a self-paced exam to see what response they entered on the handheld LCD display prior to submitting the entire test.

